


All you need is some card, skinny sticks, wood glue and odds and ends of wood for trimming.
As you read these instructions please bear in mind that my finished piece is meant to be old and worn so wherever you see splits or gaps I have left them that way intentionally….honest :-)
I start with a card base simply because it is easier than trying to glue skinny sticks together along the long thin edge. This also gives it more stability.
 Cut your card one skinny stick thickness under the height you want your shelves to be and the width of the back and 2 sides.
Here I am just using a piece from a shipping box but any sturdy card will do.

I cut all my skinny sticks in one go.
Taping them together with masking tape makes it much easier to do them in batches

Using regular wood glue, start gluing the sticks to the card.
This will be the inside back of the shelves.
Then you need to start gluing the sticks to the inside sides. You will need to leave a gap so that the sides bend in at 90 degrees.
This is easy to do, just fold the sides up so they are 90 degrees to the back and push the sticks as far into the corner as they will go. It doesn’t matter that they fall back outwards while the glue is drying.

You can see that my sides are too deep. I hadn’t decided how deep I wanted it at this stage and it is no problem to leave them and cut them card off afterwards.
While this was drying I made 2 shelves.

Again I glued the sticks to some card simply because it makes it easier and then trimmed the excess card away.
The card will be on the underneath of the shelf so won’t be seen.
Now you need to go around the outside of the card and glue skinny sticks on there. Try and match them up to those on the inside. I finished the front edges off with another stick.

You can see I also added some sticks on the inside bottom edge. This will be the support for the bottom shelf.

Glue in the top and bottom shelves
 Add a stick to the outside bottom front of the shelves and the same to the outside bottom back and sides.
 I added some very thin trim on the inside edges of the shelves to add some detail…....and cover up some small gaps that I didn’t want
The top is very simply made by gluing
sticks across it.
To finish it off I added some trim around the top and front of the shelves.
This was done with skinny sticks, scraps of wood and cocktail sticks.


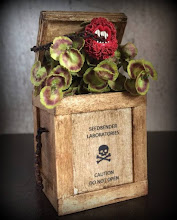
And there you have it. A very simple, inexpensive and easy to make set of shelves.
Because I wanted mine to have the appearance of a well used, worn piece of furniture I went on and beat it up somewhat before aging it.

You can use the same technique to make any shape or size of shelves.
Here's another one I made earlier.

If you go ahead and try this have fun.
If you get stuck feel free to ask me any questions.
You can click on the photos to see enlarged versions.


Beautiful work!
ReplyDeleteThank you for the tut. There are some neat tips there that I didn't know and I will use them to make a bookcase myself.
ReplyDeleteThank you and you are most welcome.....hope it comes in use :-)
ReplyDeleteVerry smart! Like the look, thank you for sharing.
ReplyDelete* marlies
Brilliant idea..
ReplyDeleteI hope anyone who makes one posts pictures on their blog :-)
ReplyDeleteThis comment has been removed by a blog administrator.
ReplyDeleteThis comment has been removed by a blog administrator.
ReplyDelete